
Who should read this?
This post is designed to help you get started using terraform. At the time of this writing, everything i’m publishing on this blog that is more than a simple script will be deployed using Terrafrom, and as such this knowledge is required.
The target for this post is to give the reader enough of an understanding to allow you to deploy terraform code from projects, but not to code them from scratch.
What is Terraform
Terraform is an open-source infrastructure-as-code tool. It has a huge advantage over other tools since it can be used across multiple platforms such as Azure, AWS, GCP, kubernetes etc, and as such the expertise gained in different teams in an organisation can share their experience and reuse modules across different platforms.

Which is fine, but what is it? Terraform is a coding language that declares the end result of a configuration. This means that you write a code descriping how you wish the environment to look, and terraform will then build the ressources based on these specs.
Terraform code uses HashiCorp Configuration Language (HCL). The filetype have the extension .tf, so just know, that everytime you see a .tf file, terraform is the tool you need, and the file will containt hcl code.
Why use Terraform?
But why should you use terraform – or really – just any Infrastructure as code tool in your environment? Well, there are multiple reasons, and I will touch a few of them here.
- Version control: Using Terraform grants you the ability to use version control. If a ressource is changed then you will have the ability check the version history and find out exactly when it happened, what changed and who changed it.
- Accountability: I’m not fan of the blame game, but using code to deploy ressources leaves a paper trail leading towards the person who created a specific ressource and could include the reason to why. At the same time it offers the ability to enforce an approval by a different person before deployment.
- Consistency across environments: Terraform can ensure that your environment are completely identical accross environments. The same code used in dev and test, can be pushed directly to prod
- Least privileges: Utilizing code automatically have the advantage that a change or creation of a ressource can be done by a Service Account. This means that we can limit who should have write permissions in an environment.
- Planning prior to deployment: Terraform allows us to run a plan. The result is a complete overview over the changes, before they are applied.
- Open Source: Terraform is – still – Open Source and free to use in most cases. Although HashiCorp was bought by IBM in april 2024 there are currently no public plans to change this.
What is the reason for not using Terraform? Really, the only one i can think of is the short term gain of time, since code and code approval steps requires ressources. But the loss is way worse. The result of not using IaC is non-identical environments, which worse case can cause downtime or data loss.
Basic terraform
Let’s cover what you need to know to get started.
In this section, I will use my project for auditting expired secrets in Entra ID. The project can be found here, and a description of the project can be found in this blog post.
Terraform files
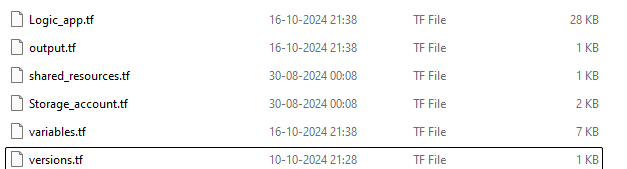
Terraform is based on .tf files. But Terraform doesen’t run on a single file,instead it runs in a directory where it imports all .tf files. This provides some unique options for a structure in the code, since you can create a .tf file for specific segments of the code.
By running Terraform on the folder shown here, it will look through all files and combine them into one, before deploying the code inside based on the blocks inside, which we will get back to shortly.
Providers
To know how to deploy the ressources, Terraform uses providers.
HashiCorp describes it pretty decently
Providers are a logical abstraction of an upstream API. They are responsible for understanding API interactions and exposing resources.
Normally for my projects, i’m using the following providers
- hashicorp/azurerm
- hashicorp/azuread
These allows me to deploy ressources in both Azure and Entra ID, but providers exists for everything from AWS to Alibaba cloud.
How to use providers
As i mentioned earlier, Terraform uses blocks to seperate content in the .tf files. I always have a file named “versions.tf”, which contains the providers, versions of the providers etc.
|
1 2 3 4 5 6 7 8 9 10 11 12 |
terraform { required_providers { azuread = { version = "=2.53.1" source = "hashicorp/azuread" } azurerm = { version = "=4.4.0" source = "hashicorp/azurerm" } } } |
Now, since this is defined here, we can use all the available ressources from these providers.
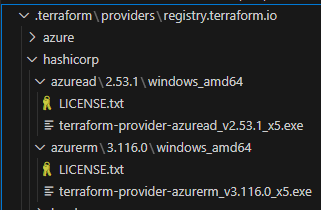
When running terraform terraform init, terraform will download the providers as shown here to the local machine.
Define versions
In the above section I have defined the version for azuread to be version 2.53.1. This will ensure that terraform will always download and use this specific version of the provider. I will always recommend you to lock the version to something stable, and then upgrade it manually when newest versions are published
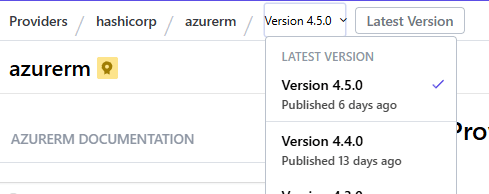
Please note, that it’s simple to upgrade the version by finding the version you want from the provider documentation page but downgrading is not.
Terraform State
Terraform is different from eg. Bicep, since it requires you to use and maintain a terraform state file. The state file is basically a record of all the ressources deployed by terraform. This means, that everytime you run a terraform apply or terraform plan it will compare the deployed ressources, to the ressources that has been recorded in the state file.
Storing the state file
If you do not define a storage location, the state file will be stored at the same location as the .tf files. This has multiple implications, since it will limit terraform to be run from the device that stores the state file. This is suitable for a local test deployment, but not for anything larger than that.
Microsoft learn contains an example on how to save the state file into a storage account, which I will use here aswell.
In this case, the state file is stored in a storage account in Azure. Due to this, the user who runs the terraform plan or terraform apply command must have write permissions to the location containing the state file.
|
1 2 3 4 5 6 7 8 9 10 11 12 13 14 |
terraform { required_providers { azurerm = { source = "hashicorp/azurerm" version = "~>3.0" } } backend "azurerm" { resource_group_name = "tfstate" storage_account_name = "<storage_account_name>" container_name = "tfstate" key = "terraform.tfstate" } } |
Install Terraform
Download Terraform
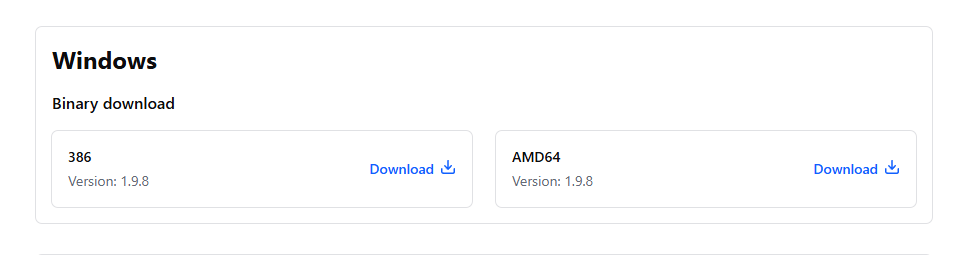
First things first. To start using Terraform you need to install it to your pc. Follow the link here and download the version that fits your architecture.
Copy the files to a permanent position
Unlike most applications in Windows, you don’t have to run the install wizard for terraform. Terraform is contained within a single executable file, which is stored inside a .zip file.

I will normally create a new folder in “C:\Program Files (x86)” named “terraform” and copy the file to there.
Copy the path to the newly created folder.
Show Windows the path – literally
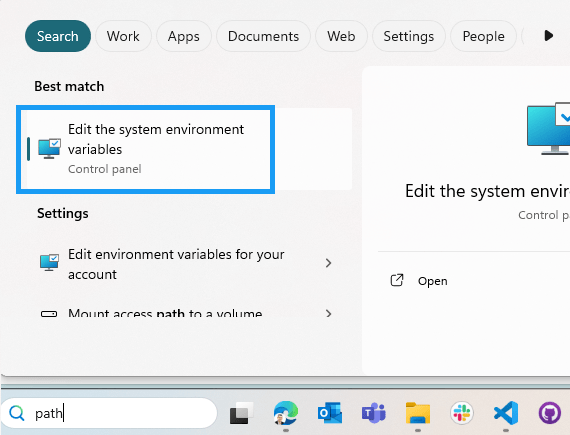
Next step, is to add the path to terraform in Windows System environmental paths. To do that, open the search bar and search for “path”. This will provide you with an application named “Edit the system environment variables”
If the search don’t show anything, the manual path is as follows:
“Windows + i” –> “System” –> “About” –> “Advanced system settings” –> Edit the system environment variables
Under “System variables”, edit “Path”, and press “new”. Now you need to paste in the path that you copied before to the folder where you saved the terraform file.
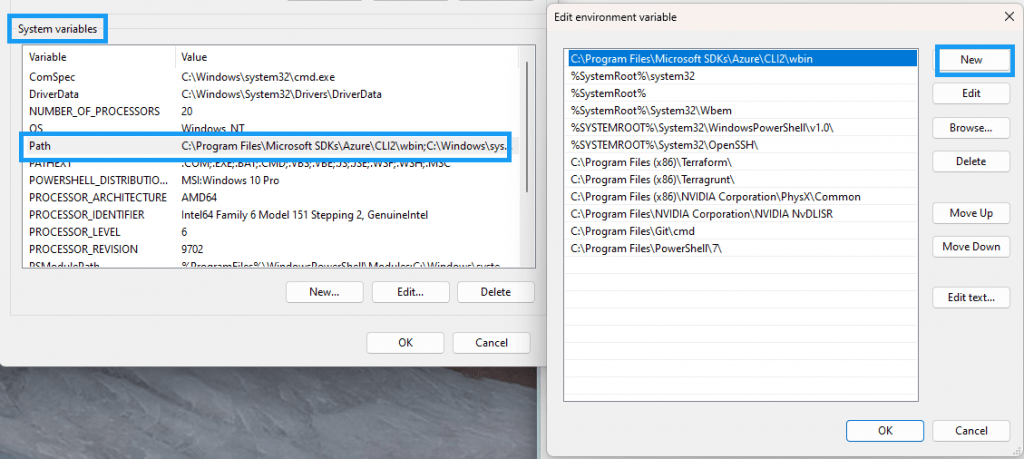
Press ok and close the windows again. You are now ready to use terraform
Install Azure CLI
When using Terraform with Azure, we need to install Azure CLI for authencation to work. So please visit
Install the Azure CLI for Windows | Microsoft Learn
And install the latest version of Azure CLI. The installer does everything for you, so run, install and you are ready for running your first terraform code.
Run Terraform
Now we are ready, so let’s create something simple in terraform and deploy it to Azure.
In this example, we will create a ressource group named terraform deploy, so let’s start with the provider.
Create a new folder, open terminal, and navigate to the folder.
Versions.tf
To deploy ressources in Azure, we need to use the azurerm provider, the documentation for the provider can be found here
In the folder you created, create a file named “versions.tf” and add the following
|
1 2 3 4 5 6 7 8 9 10 11 12 |
terraform { required_providers { azurerm = { source = "hashicorp/azurerm" version = "=4.4.0" } } } provider "azurerm" { subscription_id = "4988af7a-b93d-4015-8c22-e15231914b08" features {} } |
That’s a great start, now terraform is ready to be used.
variable.tf
We don’t want to hardcode a name to the ressource, so let’s create a new file and call it variable.tf. In this file we will store the name of the ressource group aswell as the location for all ressources.
|
1 2 3 4 5 6 7 8 9 10 11 |
variable "resource_group_name" { description = "This will be the resource group name" type = string default = "newresourcegroup" } variable "location" { description = "Define the datacenter where the resources should be deployed" type = string default = "sweden central" } |
shared_resources.tf
And the last file for this experiment. Create a new fle named “shared_resources.tf”.
|
1 2 3 4 |
resource "azurerm_resource_group" "baseline_resource_group" { name = var.resource_group_name location = var.location } |
Connect to Azure
Time to connect to Azure. Find the terminal from before and connect using Azure CLI.
|
1 2 |
# Connect to Azure CLI, I prefer to add the tenantid on connection az login --tenant "a751568d-be19-4d78-a667-ce193258c679" |
Run terraform
Time to get terraform running.
Terraform init
Start by downloading the providers, you do that by running terraform init.
|
1 2 3 4 5 6 7 8 9 10 11 12 13 14 15 16 17 18 19 20 21 22 |
PS C:\temp\Terraform\Example> terraform init Initializing the backend... Initializing provider plugins... - Finding hashicorp/azurerm versions matching "4.4.0"... - Installing hashicorp/azurerm v4.4.0... - Installed hashicorp/azurerm v4.4.0 (signed by HashiCorp) Terraform has made some changes to the provider dependency selections recorded in the .terraform.lock.hcl file. Review those changes and commit them to your version control system if they represent changes you intended to make. Terraform has been successfully initialized! You may now begin working with Terraform. Try running "terraform plan" to see any changes that are required for your infrastructure. All Terraform commands should now work. If you ever set or change modules or backend configuration for Terraform, rerun this command to reinitialize your working directory. If you forget, other commands will detect it and remind you to do so if necessary. |
The result should be that the providers are downloaded. You can see the files in the location where the .tf files are stored.
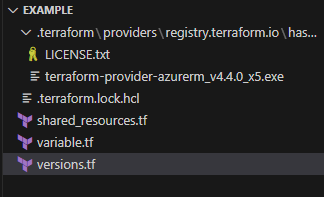
If it looks like this, then it means that you are ready to deploy using terraform
Terraform plan
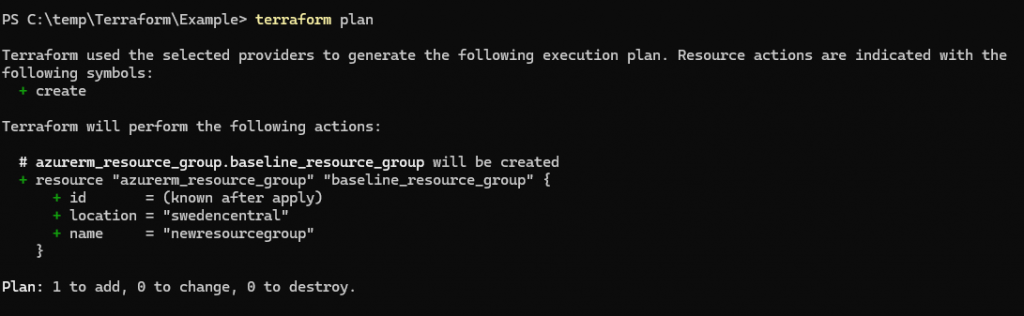
Terraform will show you what you are about to deploy. Nothing will be deployed so it’s the safe command that you can run to verify if everything looks correct.
After it is complete it will show you how many ressources it will create, the name of them and if any ressouces will be changed or deleted.
The result should look like this.
Terraform apply
Everything looks great, so let’s deploy it and verify if it works.
When using terraform apply we will still be required to confirm the changes. Terraform apply runs a plan first, and asks us to confirm the deployment. Anything else than a “yes” will cancel the operation.
So when it asks, we will confirm.
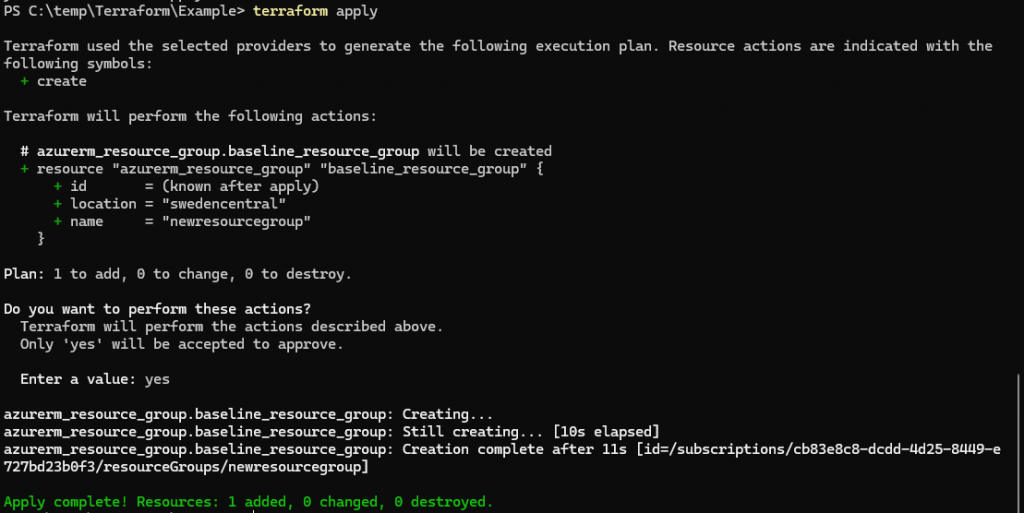
And success. You can now see it in the portal

Conclusion
This intro should allow you to get started with terraform, while understanding the basic concept, and deploy terraform code in your own environment.
You can find a selection of projects in my public github repository, where i create simple low cost soluions to common


0 Comments