Introduction
When working in Azure, we come across a feature called Resource Locks. But what exactly is it, and in what scenarios does it make sense to use?
These are the questions I will address in this post today. Join me on a brief journey as I explain what this feature entails, how to utilize it, and share my personal experiences on when it is most appropriate to apply Resource Locks.
Throughout this article, we will explore the steps to deploy it via the Azure portal and Powershell.
Let’s dive in!
What are Resource Locks?
Resource Locks in Azure serve as a fundamental feature designed to shield resources from accidental deletions or misconfigurations. While the purpose is commendable, some might not prefer using it for daily workloads due to its limited configuration options.
Nonetheless, Resource Locks still have it’s uses, which we will explore shortly.
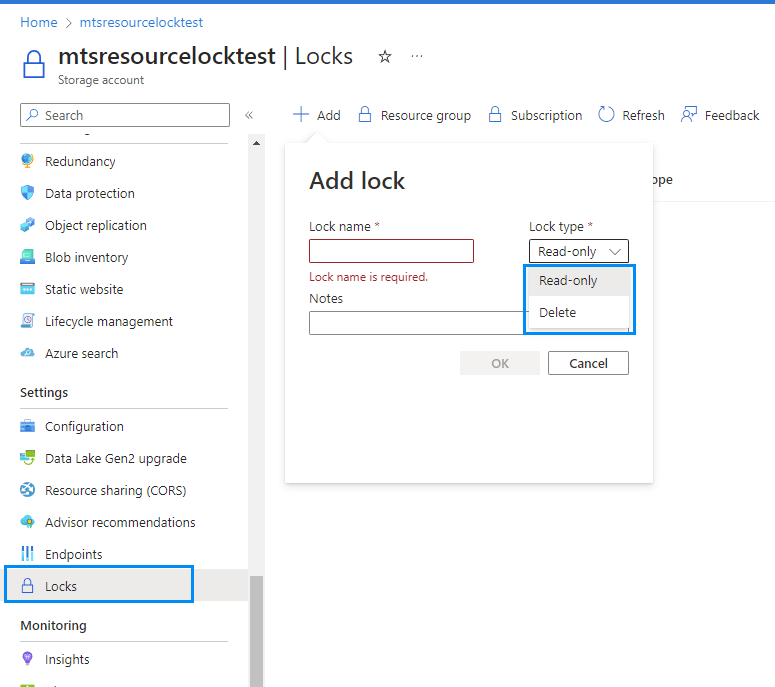
The configuration of resource locks is limited to the following two options
- Read-Only – This setting prevents the resource from being modified or deleted, while still allowing modifications to the data within the resource. It disregards all Role-Based Access Control (RBAC) permissions above the “Reader” role.
- CanNotDelete – Resource can be modified but not deleted.
These values are inherited based on the normal resource hierachy and can be set on one of the following levels
- Subscription
- Resource Group
- Resource
What is the effect of ressource Locks?
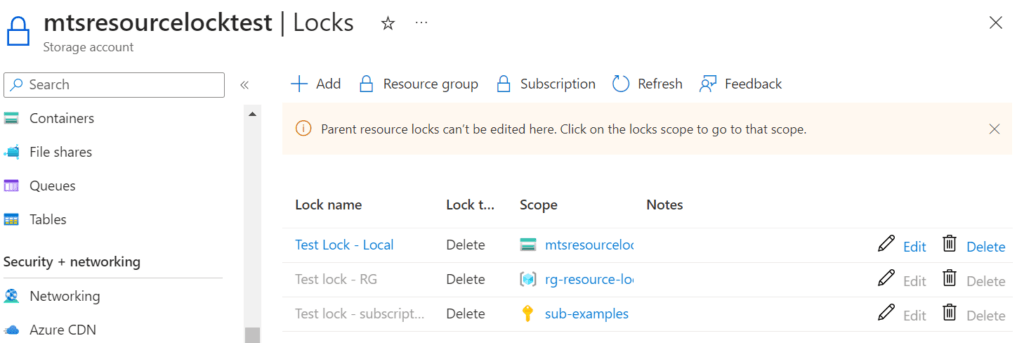
When examining a specific resource under “Locks” in Azure, the portal will always provide information about whether it is affected by a lock. If the lock is inherited, it will specify at what level this specific lock is added, such as Subscription or Resource Group level.

When utilizing the “CannotDelete” setting, the portal will also notify you if you attempt to delete a locked resource in the deletion prompt, similar to the following:

Similarly, when working with PowerShell, you will receive a corresponding message about the resource being locked and cannot be deleted, as demonstrated in the example below:

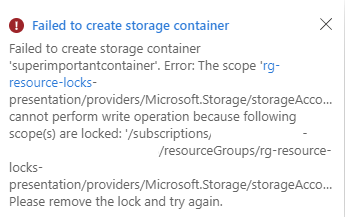
However, this clarity is unfortunately not present with the “Read-Only” lock. While you might receive a warning if any “GET” commands do not succeed, you typically won’t be informed immediately that the action you attempted has failed until you encounter a notification about the failed deployment:

Data Plane vs Control Plane – and why it matters for Resource Locks
In Azure, understanding the distinction between the Data Plane and Control Plane is crucial when working with Resource Locks. Azure encompasses multiple APIs, but for this discussion, we’ll focus on the APIs related to the Control and Data Plane.
- Control Plane – The Control Plane comprises all API calls directed towards “management.azure.com.” These API calls are responsible for managing and configuring Azure resources and services. When you interact with the Azure portal, command-line tools like Azure CLI or PowerShell, or Azure Resource Manager (ARM) templates, you are essentially making requests to the Control Plane. These requests include actions such as creating, updating, deleting, or querying Azure resources.
- Data Plane – On the other hand, the Data Plane involves specific API calls made to the individual services or resources. These API calls are used to interact with the data stored within those services. For instance, when you read or write data in an Azure Storage Account or work with data in Azure SQL Database, you are directly interacting with the Data Plane APIs.
To better illustrate this, you can utilize the developer tools available in your web browser. By inspecting the network traffic while working in the Azure portal, you can discern the API calls made to both the Control Plane and Data Plane.
Here’s an example using a storage account.

In the example above, while examining a Storage Account Container in the Azure portal, you’ll observe requests to the Control Plane (highlighted in red) for managing the Storage Account and Container configurations.
Simultaneously, you’ll see requests to the Data Plane (highlighted in blue) for performing actions like reading or writing data within the Storage Account Container.
Official Microsoft Docs can be found here
How to configure a ressource Lock
Configuring a Resource Lock is a straightforward process, and you have the flexibility to set it using your preferred method, such as CLI, PowerShell, Azure portal, Bicep, Terraform, etc. For illustration purposes, we’ll demonstrate how to set a Resource Lock using the Azure portal and PowerShell.
Portal
- Navigate to the level (Subscription, Resource Group, or Resource) where you wish to set the Resource Lock.
- In the resource details view, go to the “Locks” menu.
- Click “Add” to create a new Resource Lock.
- Choose the desired lock type, such as “ReadOnly” or “CannotDelete.”
- Provide a friendly name for the lock, which helps you identify its purpose or intent.
- Save the configuration, and the Resource Lock will take effect immediately.

Powershell
If you prefer using PowerShell to set a Resource Lock, you’ll need to provide the resource ID. A convenient approach is to find the resource, save its ID to a variable, and then use that variable in the code.
Below is an example of setting a “ReadOnly” Lock on a specific resource using PowerShell:
Note that the commands accept aither the “CanNotDelete” og ReadOnly” Parameter.
|
1 2 3 |
$ressource = Get-AzResource -ResourceGroupName "rg-resource-locks-presentation" -ResourceName "mtsresourcelocktest" Set-AzResourceLock -Scope $ressource.ResourceId -LockName "no changes" -LockLevel "ReadOnly" |
RBAC Permissions required
Unfortunately, there are only a few build-in roles that have the permissions to set or remove resource locks. This is of cause due to the security concern, where ressource Locks are supposed to be used to secure workloads from accidential deletion or accidential changes, and as such the scope of users who can change them should be limited
By the time of this post, you have to be either
- Owner
- User Access Administrator
Or alternatively, you can create you own custom role with the Microsoft.Authorization/locks/* action
Pricing
There are no seperate pricing for using Resource Locks, and as such they are a cheap security addition.
Use cases
Now that we have covered most of the explanation, we need to talk about use cases for Resource Locks. Although the idea with resource locks is okay, I still find that in most scenarios, better solutions can be achieved using alternatives like a well-structured RBAC, PIM, and Service Principals.
Where RBAC and PIM can provide highly specific permissions on resources, resource locks, on the other hand, offer only two “sets” of permissions, limited to “Reader” and “Do Not Delete.”
However, there are still cases where Resource Locks make sense:
- Protecting Critical Resources – Resource Locks can be applied to safeguard critical resources that should not be modified or deleted under any circumstances. By setting a “CannotDelete” lock, you add an extra layer of protection, ensuring that even users with elevated privileges cannot accidentally remove or alter these crucial resources.
- Winter or Summer Freeze – Resource Locks can be helpful during seasonal freezes or maintenance windows, like Winter or Summer freezes, where you want to prevent any changes to your resources during that time. By setting appropriate locks, you can enforce the freeze and ensure resources remain unchanged until the designated period ends.
- Preventing Configuration Drift in IaC – In Infrastructure as Code (IaC) environments, where changes are automated through tools like Terraform or Bicep, you can utilize Resource Locks to prevent configuration drift. By setting locks before applying changes and removing them afterward, you ensure consistency and control over your infrastructure’s state. It is worth mentioning that i prefer to solve this by denying access to ressources for everyone but the Service Principals, and provide user access behind PIM for emergency access of resources.
Final Thoughts
While Resource Locks might not be applicable in every environment or scenario, they do serve as a valuable option for providing additional security or governance in certain use cases.
However, it’s essential to weigh their benefits against the potential administrative overhead and ensure they align with your overall security and access control strategy.
Microsoft Docs
https://learn.microsoft.com/en-us/azure/azure-resource-manager/management/lock-resources?tabs=json


0 Comments